Do you love the idea of false lashes but cringe at the thought of them looking too dramatic or over the top? You’re not alone! It’s like wanting to look chic and put-together without appearing like you’re trying too hard. The good news is, achieving natural-looking false lashes is totally within your reach, and it’s simpler than you might think. Think of false lashes as the perfect brushstroke to enhance your eyes, just like a touch of highlighter can brighten your complexion.
Understanding the Basics of False Lashes
Before we dive into the nitty-gritty of application, let’s break down the basics. Think of false lashes like different types of bread. You have your baguettes, sourdough, and whole grain—each with its unique texture and look. The same goes for false lashes. Let’s explore the types and features to choose the best ones for that natural look.
Types of False Lashes
| Type | Description | Best For |
| Strip Lashes | A full set of lashes attached to a single strip. | Quick application, dramatic looks |
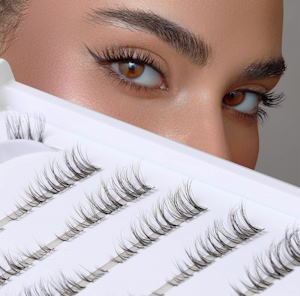
| Individual Lashes | Single lashes you apply one by one to customize your look. | Building a natural, customized look |
| Magnetic Lashes | Lashes that use magnets for application instead of glue. | Easy to apply, reusable |
| Cluster Lashes | Small bunches of lashes that you apply to create a fuller look. | Adds volume without looking fake |
For a natural look, strip lashes with a clear band are a great choice. They’re easy to apply and blend well with your natural lashes. Opt for wispy and soft lashes rather than ones that are too voluminous or long.
Preparing Your Natural Lashes
Think of your natural lashes as the foundation for a house. If the foundation isn’t strong, the house won’t stand. Similarly, prepping your natural lashes correctly will set the stage for your false lashes to look their best.
How to Prep Your Lashes
- Clean Your Lashes:
- Use a gentle makeup remover to ensure there’s no leftover mascara or makeup. Clean lashes provide a better surface for the false lashes to stick to.
- Tip: Even if you don’t wear makeup, cleansing your lashes removes oils and residue that can interfere with the adhesive.
- Curl Your Lashes:
- Use an eyelash curler to give your lashes a natural lift. This step is crucial for blending your natural lashes with the false ones.
- Tip: Curl your lashes before applying mascara or false lashes for the best results.
- Apply Mascara Sparingly:
- Apply a thin layer of mascara to give your lashes a bit of volume and help bond them with the false lashes.
- Tip: Don’t overdo it! Too much mascara can make the false lashes look clumpy.

Here’s a quick list to follow:
| Step | Action |
| Clean Lashes | Use a gentle makeup remover. |
| Curl Lashes | Use an eyelash curler for a natural lift. |
| Apply Mascara | Apply a thin layer to your natural lashes. |
Applying False Lashes Like a Pro
Applying false lashes can seem like a tricky task, but think of it like applying a sticker—patience and precision are key.
Prepping the Lashes
- Measure and Trim the Lashes:
- Hold the lash strip up to your eye and see if it fits. If it’s too long, trim it from the outer edge.
- Tip: Trimming the lashes ensures they fit your eye shape perfectly and look more natural.
- Apply Adhesive Correctly:
- Apply a thin layer of lash glue to the band. Let it sit for about 30 seconds until it becomes tacky.
- Tip: Use a glue with a clear or dark finish depending on your preference.
Application Process
- Position the Lashes:
- Place the lash strip as close to your natural lash line as possible.
- Tip: You can use tweezers or your fingers to hold the lashes in place.
- Secure the Lashes:
- Gently press the lashes down from the center to the edges to ensure they stick properly.
- Tip: Make sure there are no gaps between the false lashes and your natural lashes.
Here’s a step-by-step guide to follow:
| Step | Action |
| Measure and Trim | Fit the lashes to your eye and trim if necessary. |
| Apply Adhesive | Put glue on the lash band and let it become tacky. |
| Position Lashes | Place the lashes close to the natural lash line. |
| Secure Lashes | Press down from the center to the edges. |
Blending False Lashes with Natural Lashes
Once your false lashes are on, it’s time to make them look like they’re a part of you—like blending two puzzle pieces together.
How to Blend
- Use Eyeliner to Cover the Band:
- A thin line of eyeliner can cover the band of the false lashes and create a seamless look.
- Tip: Choose a color that matches your natural lash line for the best effect.
- Adjust Lashes for a Seamless Look:
- If you notice any gaps or areas where the lashes aren’t sticking, gently adjust them.
- Tip: A cotton swab dipped in makeup remover can help fix any mistakes.
Final Touches
- Lightly Re-Curl Lashes:
- If your natural lashes and false lashes aren’t blending perfectly, you can use an eyelash curler to blend them together.
- Tip: Be gentle to avoid damaging your natural lashes.
- Add a Bit More Mascara If Needed:
- If the lashes still look a bit separated, apply a tiny bit of mascara to blend them better.
- Tip: Use a light hand to avoid clumping.
| Step | Action |
| Use Eyeliner | Apply a thin line to cover the lash band. |
| Adjust Lashes | Fix any gaps or uneven areas. |
| Re-Curl Lashes | Lightly curl lashes for a unified look. |
| Add Mascara | Apply a bit of mascara to blend natural and false lashes. |
Maintaining Your Natural-Looking False Lashes
Now that you’ve achieved that perfect lash look, it’s important to take care of both your false and natural lashes to keep everything looking fabulous.
How to Maintain
 Remove Lashes Safely:
- Gently peel off the false lashes starting from the outer corner.
- Tip: Use a makeup remover designed for false lashes to avoid damaging your natural ones.
- Clean and Store Lashes for Reuse:
- Clean the lashes with a bit of makeup remover and store them in their original packaging.
- Tip: Proper storage helps prolong the life of your lashes.
- Take Care of Your Natural Lashes:
- Use a lash serum to keep your natural lashes healthy.
- Tip: A healthy base means better results for your false lashes!
| Step | Action |
| Remove Lashes | Gently peel off starting from the outer corner. |
| Clean Lashes | Clean with makeup remover and store properly. |
| Care for Natural Lashes | Use a lash serum for healthy natural lashes. |
There you have it—your complete guide to achieving natural-looking false lashes! By understanding the different types of lashes, preparing your natural lashes, applying false lashes with precision, and blending them seamlessly, you can achieve that perfect, natural look. Remember, it’s like baking a cake: you need the right ingredients and a bit of practice to get it just right. So, grab your lashes, follow these steps, and get ready to show off those fabulous, natural-looking lashes!
Recommended To You